|
|
|
|
|
|
|
|
Note: This version of the BioTapestry Tutorial on Using and Creating Paths shows reduced-size screen shots. You can click on any image and see the full-size image in a separate window. To get the version with full-size images, go here.
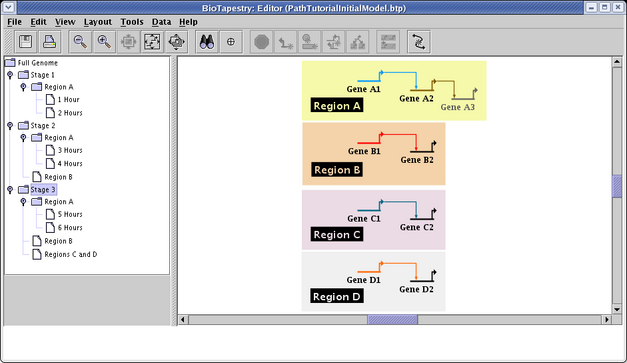
BioTapestry Version 2.1 has the ability to define paths through the model hierarchy. You may have situations where you have a complex model hierarchy, and you want to be able to easily progress through a series of closely related submodels that may be widely dispersed across that hierarchy. For example, in this tutorial, we will begin with a predefined model that has a set of separate models, named Stage 1 to Stage 3, where each stage represents an increasingly complex set of developmental regions. Furthermore, each stage has submodels that focus in on each particular region for that stage. However, we want to have a simple way of serially tracking the development of Region A over hours 1 to 6. Since the genes in Region A are modeled using variable activity levels, being able to smoothly more through the time points helps to visualize the changes in the network:
You will want to retrieve the starting point model for this tutorial from the BioTapestry web site: PathTutorialInitialModel.btp
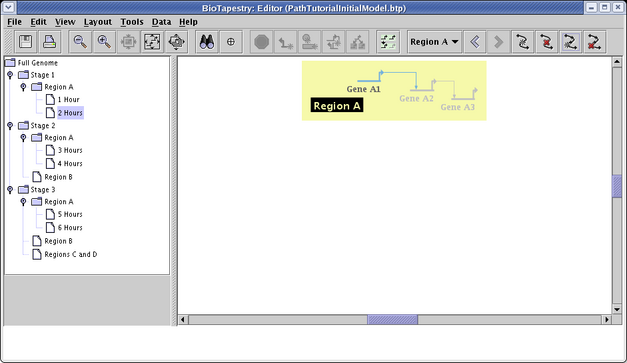
How you save files at a URL depends on your web browser. With Firefox, for example, you would right-click on the above link and select Save Link As... to save the file. After saving PathTutorialInitialModel.btp on your computer, start the BioTapestry Editor and open the file. You should see this:
You may want to navigate around the model hierarchy to see how it is set up. What we want to do is create a way to smoothly track the development of Region A across the six submodels named 1 Hour through 6 Hours. We will do this by defining a path.
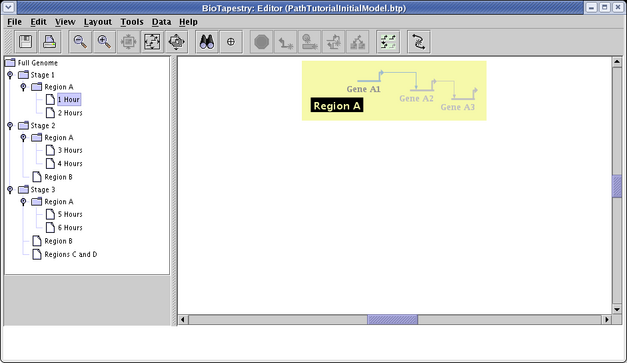
To create a path, go to the model that you want to be the first stop on the path. For this tutorial, the first stop is the 1 Hour submodel, so select it in the navigation view on the left:
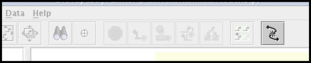
Now create the path by clicking the Create New Path button on the toolbar:
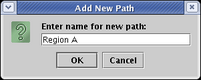
This brings up the dialog to assign a name to the new path. The path name is what will appear in the Path Selector on the toolbar, so each path will need a unique name. Since we will be using this path to track the development of Region A, give the path that name and click OK:
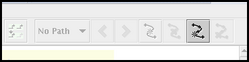
Creating a path automatically makes the current model the first stop on the path. Now that a path has been defined, the full set of path navigation and editing buttons will appear on the toolbar, though since there is no place to go on this one-stop path, the forward and buttons are both currently inactive:

These are the path buttons on the toolbar, from left to right, as shown below:
![]() Path Selector: Allows you to choose which path to follow, or No Path. If you
move off a path, this will reset to No Path. When you select a path, you will go back
to the last stop you were visiting.
Path Selector: Allows you to choose which path to follow, or No Path. If you
move off a path, this will reset to No Path. When you select a path, you will go back
to the last stop you were visiting.
![]() Step Back Along Path: Go back one stop.
Step Back Along Path: Go back one stop.
![]() Step Forward Along Path: Go forward one stop.
Step Forward Along Path: Go forward one stop.
![]() Create New Path: Start a new path, with the current model as the first stop.
Create New Path: Start a new path, with the current model as the first stop.
![]() Delete Current Path: Delete the currently selected path.
Delete Current Path: Delete the currently selected path.
![]() Add New Stop to Path: Add a new path stop. You can select which path and where
to add the new stop after clicking on this button.
Add New Stop to Path: Add a new path stop. You can select which path and where
to add the new stop after clicking on this button.
![]() Delete Current Stop on Path: Delete the stop you are on from the current path.
Delete Current Stop on Path: Delete the stop you are on from the current path.
Once a path has been created, you can add more "stops" to the path. Clicking on the forward and back path buttons will then allow you to visit all the stops in a path in a serial fashion. To continue adding to the Region A path, select the 2 Hours submodel. Note that the path selection changes back to No Path, since viewing the 2 Hours submodel has moved you off the existing Region A path:

Now click on the Add New Stop to Path button on the toolbar:
This brings up a dialog, where you can specify which path to add the stop to, and where that stop should be added. By default, it will add the new stop right after the last stop you were visiting on the last path you were visiting, but you can change this by setting the various options. We are happy with these default settings, so just click OK:

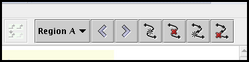
So the Region A path we are building now has two stops. Note that the Step Back Along Path button is now active, since we are at the second stop on the path and from here you can navigate back to the first stop:
NOTE: If you did try going back to the 1 Hour stop on the path, be sure to click on the Step Forward Along Path button to get back to the 2 Hours stop, since we are about to keep adding onto the end of the path!
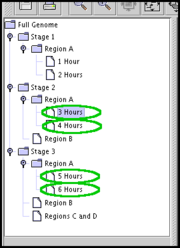
You need to add four more stops to the path, doing exactly what you did before. Select the 3 Hours submodel, click the Add New Stop to Path button on the toolbar, and accept the default placement settings for the new stop. Then do the same for 4 Hours, 5 Hours, and finally 6 Hours, as shown below:
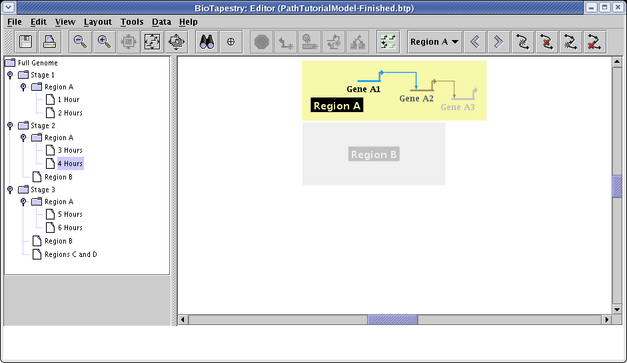
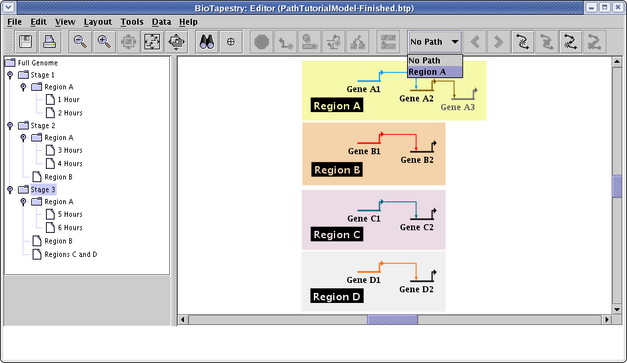
Now that a path has been created, if you then save the model (here it has been saved to PathTutorialModel-Finished.btp), then whenever you load that file into BioTapestry, the Path Selector on the toolbar will be activated, and you can choose to navigate along any defined path. For example, select the path named Region A:
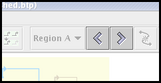
Clicking on the Path Navigation Arrows, on the toolbar next to the Path Selector, lets you move backwards and forwards among the stops along the path:
So now the variable activity genes contained in the closely related Region A hourly submodels, though widely dispersed in the model hierarchy, can be viewed in a single smooth progression: