Installation
- Obtain and install the Java RE and Apache Tomcat
- Supported versions:
- Installation
- Follow the installation instructions for your server or workstation as provided by Oracle (Java) and Apache (Tomcat). Install Java first, then install Tomcat
- Note that if you are already using Apache Web Server as your web server and wish to have your web application accessed from the same port as your other web pages, you will need to redirect requests for the web application to the port Tomcat is using (often port 8080). This can be done with mod_proxy and the ProxyPass and ProxyPassReverse directives
- Start Tomcat and confirm it is running (see Tomcat documentation: Version 6, Version 7)
- Download the BioTapestry Web Client ZIP package (NOTE: Still the Version 7.0.0 Viewer; 7.1 Coming soon!) and unzip it, which will produce a folder containing the Web Client WAR file, a copy of this HOWTO, and copies of the relevant licenses.
- Place the BTWebViewer.war file in the Tomcat /webapps directory
- If Tomcat is running properly, the WAR will be automatically unpackaged and deployed
- The web application will deploy into a directory named for the WAR file. Eg., the default WAR file name is BTWebViewer.war, so the web application directory will be named /BTWebViewer
- If you would like a different application URL and directory, rename the WAR file before placing it into the /webapps directory so it will be deployed with this name
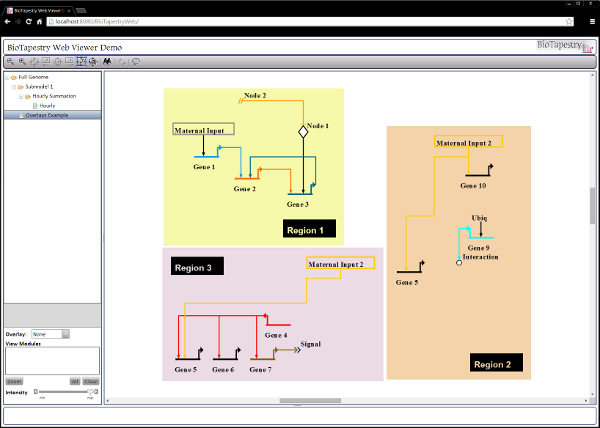
- A test BTP file, BTWebExample.btp, will display when you access your BioTapestry web application via the URL, and should look like this:

(Shown in Windows 7 Chrome)
- Add your BTP file to the /WEB-INF/data directory
- Always place your model files in the /WEB-INF/data directory
- You can make a directory substructure under the /WEB-INF/data directory to organize model files if you want to, but the configuration.txt file must reflect this (see below)
- Edit configuration.txt to indicate the path and file name of the model to display
- If there is already a modelfile entry (eg. modelfile=<Filename>.btp) edit the portion after the equals sign (=) to be the path to your file within the /WEB-INF/data directory
- If you have made a directory substructure under /WEB-INF/data, your model file listing should be relative to /WEB-INF/data. For example, if your file's path is /WEB-INF/data/myfiles/<Filename>.btp the entry would be modelfile=myfiles/<Filename>.btp
- If there is no modelfile line, add it:
modelfile=[path from WEB-INF/data/]<Filename>.btp
- If the file is in /WEB-INF/data with no directory substructure, use just the filename:
modefile=<Filename>.btp
- Edit the Title.html file in /customizations to reflect the header text you would like to see displayed
- This text is parsed as HTML and can contain HTML markup
- If you wish to add an image to this area:
- It should be no more than 40px tall
- It should be placed in the /images directory, and linked from there, eg. <img src="images/<Filename>.jpg" />
- Use the Tomcat Web Application Manager to restart the web application
- You can either Stop and then Start the application, or simply Reload it.
- See Tomcat's documentation for more information on using the Web Application Manager to manage the BioTapestry Web Viewer application.
- Reload or Stop>Start will cause the application to reread configuration.txt and put any changes into effect.
Notes
- Any time you switch the file entry in configuration.txt you will need to reload the application via the Tomcat Application Manager
- If you have reloaded the application in the Tomcat Application Manager it is often a good idea to empty your browser's cache and reload the BioTapestry Web Application
Last updated: September 29, 2016


