|
|
|
|
|
|
|
|
Note: This version of FAQ Answers: Export Options shows reduced-size screen shots. You can click on any image and see the full-size image in a separate window. To get the version with full-size images, go here.
While viewing any model in the network hierarchy, you can create a PNG (Portable Network Graphics) or JPEG image of that network. (With custom installations of BioTapestry from source code, it is also possible to generate TIFF images.) Note that it is highly recommended that you use PNG images for the type of graphics present in a BioTapestry network (basically line art). JPEG images, even if set to best quality, will still tend to introduce undesirable color artifacts in the final product.
You have two options for image exports. From the main menu, select either File->Export->Simple Image Export... or File->Export->Export Image for Publication... (the latter is shown below). The Simple Image Export option allows you to simply set either the magnification or one of the dimensions (in pixels), and it will create an image of that size. For more fine-grained control of the image parameters (e.g. the resolution, actual size in inches or centimeters, aspect ratio), which is often needed for producing images for publication, you would use the more involved Export Image for Publication... option. Note that very high resolution images (e.g. 600 dpi) of large networks might cause program memory to run out, so save your work first if you get a warning about large images. (If you have problems, you can try doing the export after starting the program up from scratch, when the most memory is available, or try a lower resolution.)
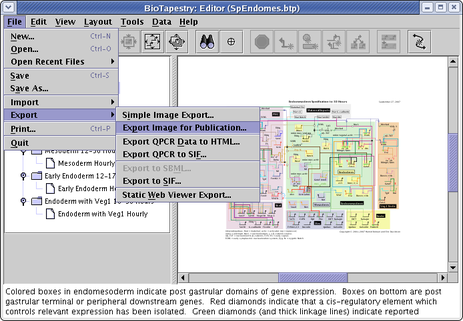
Yes. There are two ways to publish models to the web. The preferred method uses the BioTapestry Viewer program, which uses Java Web Start. A simpler alternative method uses a large set of static PNG images of various sizes and some wrapper HTML files to create a web-browser-only technique. To use this feature, select File->Export->Static Web Viewer Export... from the main menu (see below). You will need to specify a target directory for all the images and HTML files. Once this is done, you can view the result by pointing your web browser at the suIndex.html page in the target directory.
If you want to use the images for some other purpose, you can look at one of the index files in the directory, e.g. suTreeSmall.html, which shows you (via the html links) the connection between the user-visible model name and the internal model ID that is used to generate the unique image names.

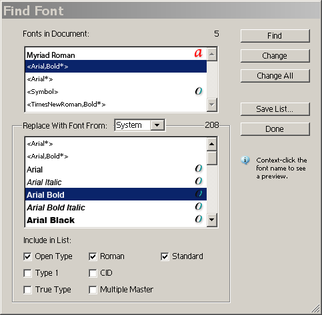
There is no "official" way to create a stroke-based image representation of a network like the one used by Adobe Illustrator. However, when printing a network from BioTapestry (using File->Print...), depending on your computer, you may have an option to print to an Adode PDF representation (or to a Postscript file on a Linux box). You can then import that PDF file into Adobe Illustrator. The biggest roadblock to this approach is needing to repair font assignments. Typically, the PDF import into Illustrator will complain that fonts (e.g. Arial; Arial, Bold; Times New Roman, Bold) were not found and had to be replaced with default fonts. To correct this in Illustrator, you would choose Type->Find Font, and replace each of the broken fonts with one from the System set available to Illustrator. The picture below shows how you select the font to replace, select the font to replace it with (from the selected System list), and then click on the Change All button. Do these steps again for each of the broken fonts. When you are done, you will want to inspect the network image to make sure that the font sizes are set so that the text in box nodes, region labels, and so forth are correctly rendered. The results seem to works best if you do the export to PDF on the same machine as the Illustrator import.
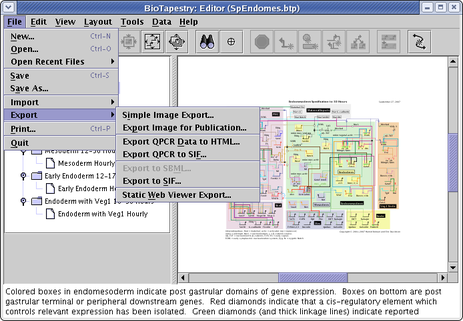
In addition to the exports described above, there are a few other export options available:
Export QPCR Data to HTML: This creates a single HTML file of the raw perturbation ("QPCR") data table, in a form used by the experimental data pages.
Export QPCR Data to SIF: This dumps the raw perturbation ("QPCR") data as an influence network into a SIF (simple interchange format) file used by Cytoscape.
Export to SBML: This is described in the FAQ question about simulation.
Export to SIF: This dumps the current network to a SIF (simple interchange format) file used by Cytoscape. The format is described below.
The menu to access these exports is shown below. While several other export options have been requested (e.g. interaction instruction lists to CSV format), they have not yet been implemented.
When you choose the Export to SIF option, some information is lost, e.g. the node type if the node is named. The node names used in this export are designed to be unique, as well as information-rich, so they can get rather cryptic. The format for an Export to SIF file line is:
nodeID1 [tab] [PROMOTES | REPRESSES | REGULATES] [tab] nodeID2
where the link sign (positive, negative, or neutral), is denoted
in the middle interaction field. The [tab] entries indicate the tabs that are
used to separate the fields.
In the top-level Full Genome root network, the nodeID is either just the gene name (which is globally unique), or in the case of non-gene nodes, the node name followed by a period, followed by the unique internal node ID. If the node is unnamed, then the name is replaced by the node type inside parenthesis. For example:
(bubble).15 [tab] PROMOTES [tab] DeltanB-TCF.25 [tab] REPRESSES [tab] Wnt8 Below the top level, regions are present, and the region name, in square brackets, followed by a colon, is prepended to the node ID. Note that region names are unique. Also, for non-genes, the node instance number is appended with a colon. For example:
[PMC]:(bubble).15:0 [tab] PROMOTES [tab] [PMC]:Delta [Mesoderm]:nB-TCF.25:4 [tab] REPRESSES [tab] [Mesoderm]:Wnt8
Note that although, in almost every case, this method should create unique IDs, it is possible to name a node that collides.
If the system detects such a collision, it will prepend "_" underscores to the ID as needed to make it unique.
This test for uniqueness ignores blanks in the names and is also case-insensitive.
Next, if the node activity level is not the default active, the system will add an activity suffix
(inactive, vestigial, or variable) to the node ID, contained in curly brackets "{}".
Finally, in dynamic (e.g. time-slider) models, you can add "extra nodes" to the model that are not in one of the included regions. This
is often done to show, for example, an incoming signal node in a neighboring region, or the link inbound from a neighboring region.
In these cases, the region name will the replaced by the string "--no region--", followed by the node ID and instance ID, e.g.:
[--no region--28:1]:(bare).28:1{inactive}Any singleton nodes in the network will be appended to the end in a single-field node-only interaction line.
The same Java JAR file that is used for the Editor can also run the Viewer; it just uses a different entry point. However, it is preferable to use a minimal stripped down JAR file to run the viewer. Also, you need to bundle up your data file in a JAR, and have your web server host the appropriate JNLP file. A ZIP archive that contains all the necessary pieces, as well as a HOWTO guide, is available on the BioTapestry web site; see here for more information.